Introduction
Maro Photographer Best web application for your business specially for photographers
- Item Name: Maro Photographer
- Item Version: v 1.0
- Created: 5/12/2016
- Last update: 2/01/2017
- Author: Marwa El-Manawy
- Support Questions: marwa@elmanawy.info
Hi there!
Thank you for buying my web application. Hope it will help to improve your business or impress your clients.
This documentation is to help you regarding each step of customization.
Please read the documentation carefully to understand how this script is made and how to edit this properly and how you install script.
This script based on bootstrap framework for design using ( HTML, CSS, Javascript, JQuery ), and script based on codeigniter framework using ( PHP, MySql ) language .
About
Now, Lets get started to tell you about Maro Photographer.
Maro Photographer is a full featured CMS software portal for photographer. this is a new script we made and started to sell because we saw the needing for business website, you can just establish this script to get the following features (go to FEATURES section to know more) and more with updates we're going to upload later.
Our portal is providing to you the best way to make your life going easier
it's easy to use, so friendly with SEO, and more...
Don't hesitate to contact me if you have inquiry or suggestions, and support at:
marwa@elmanawy.info
System
- Backend Framework: Built on CodeIgniter
- Frontend Framework: Built on Bootstrap
- Requires PHP 5.6+
- Supports MySQL, Mysqli.
Requirements
You will need the following softwares to customize this template.
1- Code Editing Software (eg: Netbeans, Sublime Text or Notepad)
2- Web Browser for testing (eg: Google Chrome or Mozilla Firefox)
3- FTP Tool to upload files to Server (eg: FileZilla)
Features
100% Responsive Design
Clean Coding
Easy Customization
Great Support
- Totally secured system (SQL injection, XSS, CSRF)
- Login System, Admin control panel system with full options
- Easy to install and usability(without any coding knowledge needed).
- Flexible and easy Control Panel to mange the website.
- Friendly with SEO for website, blog and albums.
- Awesome Design for Website and admin panel
- Fully Responsive for Website and admin panel
- Clean Code with hight performance.
- Easy Customization
- Trendy website interface included.
- Home page with dynamic slider images.
- About photographer page with more details
- Sessions Page include awesome gallery of All sessions with sessions category filter
- Session Album Page include featured image, video, session images, description, number of album views and more features..
- Blog posts page filtered with blog category
- Sessions Price Package, Any user can reserve with you easily.
- Contact form to make your client reach you easily.
- Admin(You)mange:
- website settings(Logo, Favicon, Website Description, Personal contact information, Social media links)
- Manage Search Engine optimization tools for meta description and meta keywords
- Dashboard Analytics has summery of everything happen ( count of views and visitors, latest blog posts added, latest sessions added, count number for all sessions and images and blog posts with its categories).
- About Photographer Details with many features
- Sliders and its Content
- Package prices for sessions with adding discounts and currency options
- unlimited Blog categories
- Unlimited Blog posts
- Unlimited Sessions Categories
- Unlimited Sessions Albums with full options(SEO options, number of views, featured image, video, multi uploading images, description, and more..)
- more amazing features is coming up.
Installation
- create a database and user have a full privileges to the database.
-
import the file Database.sql to your database from phpMyAdmin.
You can find the database file in (root) folder under the name of (database.sql), now you should visit your PHPmyadmin client on your server
-
Extract and upload source files to your server.
you can also watch this if you find this difficult
-
update the database.php file located into "root/application/config/database.php".
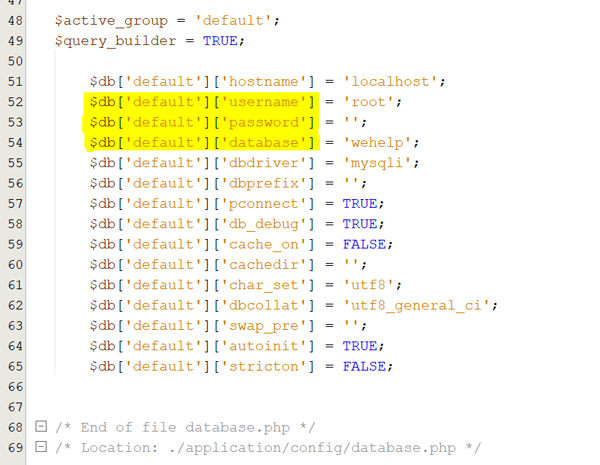
- You are done.
To integrate Disqus on your website.
-
a. Follow this link to guide you how to install it.
https://help.disqus.com/installation/universal-embed-code
-
b. after integrate you will get embeded code like the code in image below
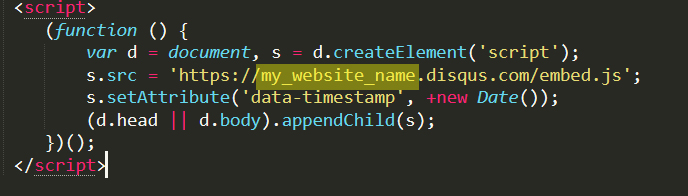
-
c. Then copy the website name in this url and adding it in your admin panel setting in Disquss username field.

-
e. Finally you will get this awesome comments form and reactions in your website.
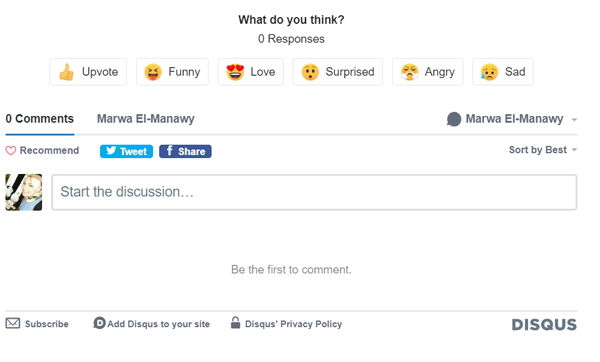
Upgrade From v3.0 to v3.1:
- Run this query to your phpmyadmin "INSERT INTO `settings` (`key`) VALUES ('disqus_username');"
- extract and upload source files to your server
- update the database.php file located into "root/application/config/database.php"
- You are done.
Getting Start
You just need to follow this steps to keep an eye on your new website:
go to this link before you go on:
http://yourDomainName.com/admin
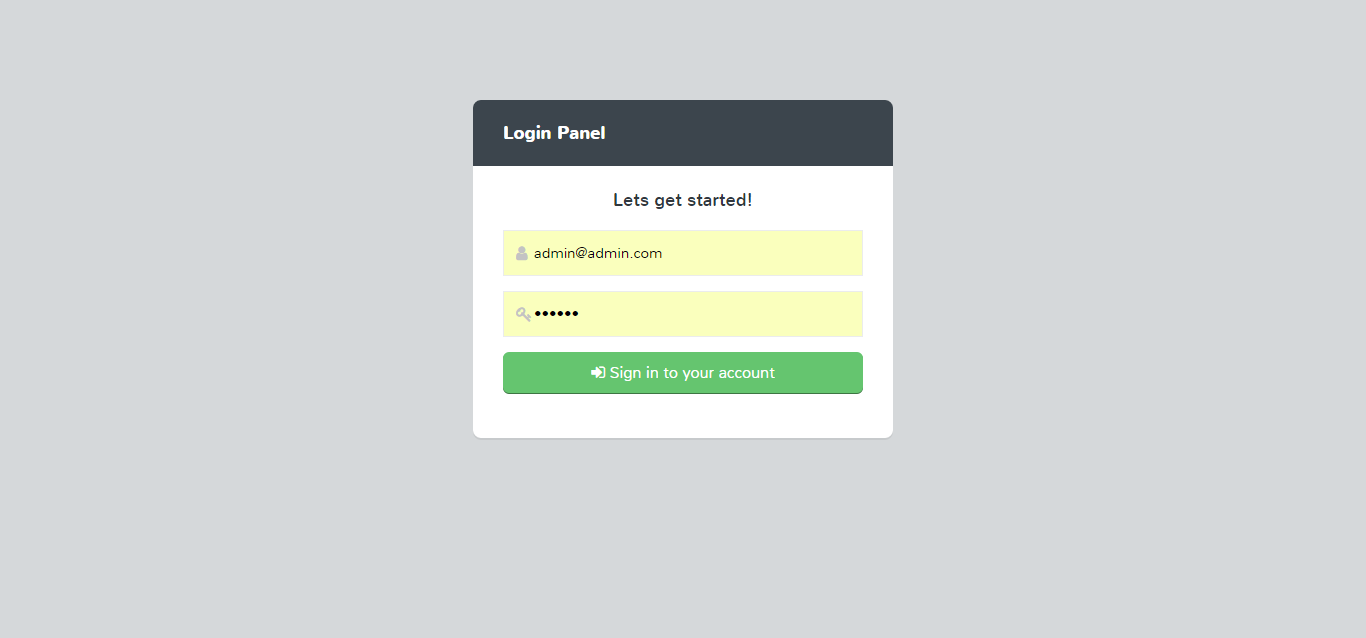
Type your admin username and password:
Email: admin@admin.com
Password: 123456
and follow those instructions
Change Logs
1- - Updating php version.
Upgrade from Version 3.1 to 3.2
1- Run the queries provided to your database from phpMyAdmin.
ALTER TABLE `aboutme`
ADD COLUMN `established` VARCHAR(10) NULL AFTER `name`,
ADD COLUMN `sessions` VARCHAR(10) NULL AFTER `established`,
ADD COLUMN `clients` VARCHAR(10) NULL AFTER `sessions`,
ADD COLUMN `meetings` VARCHAR(10) NULL AFTER `clients`;
CREATE TABLE `testimonials`(
`testimonial_id` INT NOT NULL AUTO_INCREMENT,
`name` VARCHAR(300),
`message` TEXT,
`image` VARCHAR(300),
PRIMARY KEY (`testimonial_id`)
);
ALTER TABLE `marophotographer`.`posts`
DROP COLUMN `visits`,
ADD COLUMN `visits` INT(11) DEFAULT 0 NULL AFTER `created`;
2- Extract and upload source files to your server. don't upload cdn folder to keep your data
3- Update the database.php file located into "root/application/config/database.php"
4- Update the email.php file located into "root/application/config/email.php"
5- You are done.
1- Adding number of views for clog post.
2- Adding more fields for about me module like(#clients, #meetings, sessions,..).
3- Create testimonials modules.
Upgrade from Version 3.1 to 3.2
1- Run the queries provided to your database from phpMyAdmin.
ALTER TABLE `aboutme`
ADD COLUMN `established` VARCHAR(10) NULL AFTER `name`,
ADD COLUMN `sessions` VARCHAR(10) NULL AFTER `established`,
ADD COLUMN `clients` VARCHAR(10) NULL AFTER `sessions`,
ADD COLUMN `meetings` VARCHAR(10) NULL AFTER `clients`;
CREATE TABLE `testimonials`(
`testimonial_id` INT NOT NULL AUTO_INCREMENT,
`name` VARCHAR(300),
`message` TEXT,
`image` VARCHAR(300),
PRIMARY KEY (`testimonial_id`)
);
ALTER TABLE `marophotographer`.`posts`
DROP COLUMN `visits`,
ADD COLUMN `visits` INT(11) DEFAULT 0 NULL AFTER `created`;
2- Extract and upload source files to your server. don't upload cdn folder to keep your data
3- Update the database.php file located into "root/application/config/database.php"
4- Update the email.php file located into "root/application/config/email.php"
5- You are done.
1- Comments, share and react on Session gallery and blog posts using disqus.
1- Ux Update. 2- Admin upload multi images for session gallery in one time and can sort it. 3- better performance.
1- Adding discount and currency option for sessions prices.
1- Adding Packages prices for sessions.
1- Fixing Bug. 2- Adding Blog categories with its posts.
1- Initial version.
Support
- If you have any questions feel free to contact us at support@elmanawy.info
- If you need a professional to install it for you for free, just contact us at support@elmanawy.info with your purchase no.
- If you need any modifications just contact support at support@elmanawy.info
Reach US:


Best Regards, Marwa El-Manawy